|
Charis Cuisine
Homemade
Garlic Dill Sauerkraut
One yummy way to ferment your food and
keep friendly microbiome in your gut!
Step-by-step instructions
happily shared with you by David Oshel
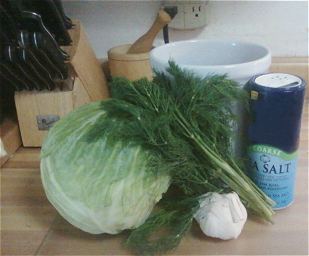
Ingredients and
items you will need:
Sea salt
1 cabbage – green, purple, whatever you fancy
fresh dill
Garlic
Optional: Carrots, caraway seeds, or any other veggies and spices
you want to throw in there. Kraut can be creative!
A large pot or bowl to mix it in
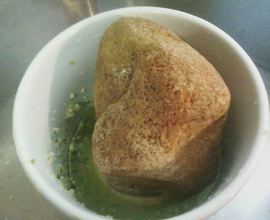
Some kind of weight – a jar full of water that fits inside the mouth
of your canning jar , or a scrubbed and boiled rock
A few elastic bands
Step 1: Remove the very outer leaves of your cabbage and
throw them away. Then rinse your cabbage under some cool water,
shake it out, and then take off 3 or 4 more of the large outer
leaves and put them aside for later.
Step 2: Start chopping your cabbage. Because the
lactobacillus bacteria needed for fermenting are found inside of the
leaves, you want to chop it as finely as possible in order to get
the most surface area. You can chop it in a food processor or by
hand.

Put your chopped cabbage in a
large bowl or pot. It seems like an absolutely ridiculous amount,
but trust me – the volume goes way, way down.
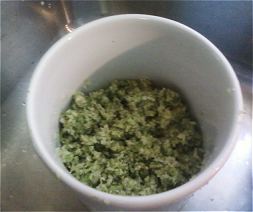
Step 3: Chop up anything else you want to put in the kraut. I
chopped up one bunch of fresh dill and cloves of garlic.
Step 4: Add your sea salt to the mix. Salt does two things –
draws the juice out of the cabbage, and also inhibits unfriendly
microbes from growing in your ferment. The rule is 3 tablespoons per
5 pounds of cabbage. So… maybe weigh your cabbage at the store
before you buy it (or at home if you have a scale). Add 6/10
TBS. salt per pound of cabbage.
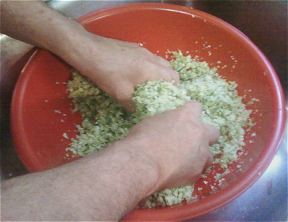
Step 5: This is the fun part! Wash your hands really well,
and get down and dirty! Stick your hands in your huge pot of cabbage
and squish and mash! The aim for this squishing and mashing is to
work the salt throughout and get the cabbage to release it’s magical
juices. Keep doing it for 15 minutes at least, until there’s a
decent amount of brine.
Step 6: Wash your hands and kraut vessels really well and
then begin stuffing your cabbage into them, stopping a couple inches
before the top of the jar. You really want to make sure you pack the
cabbage as tight as possible as to get all air pockets out of it.
Hopefully the brine has now risen above the cabbage… if not, that is
okay, because the salt will continue to draw out more juice.
Step 7: Take the large cabbage leaves that you had put aside
and fold them up and place them into the top of the jar, as sort of
a blankety cover for the shredded kraut. You may need to break it
apart to get it in there, just as long as it sort of covers
everything.
Step 8: If you are using a jar with water as your weight,
take off any labels that might be on it and wash it really well with
soap. If you are using rocks, it probably has some weird stuff from
outside on it, so wash and boil it for ten minutes to sanitize it.
Place your weights into the jars over the large cabbage leaf covers
and press and squish everything down until the brine rises well
above the cabbage. If it hasn’t yet, it will, so don’t worry. I use
a perfectly fitted plate under the rock to hold the contents firmly
down.
The purpose of the weight is to make sure that the cabbage stays
packed and is not exposed to the air. You see, the awesome
lacto-fermentation process that is happening to transform your salty
cabbage into probiotic magic takes place in an anaerobic environment
– one without oxygen. Bad microbes and bacteria that will spoil your
food can only grow in an aerobic environment – in other words, in
the presence of oxygen.
So if your cabbage is weighted down and safely submerged under the
brine, it’s safe and can’t go bad. This is why you also want to make
sure you packed your cabbage in there really good to get rid of any
air pockets in which bad microbes could grow.
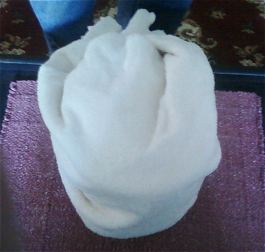
Step 9: Cover the whole thing with something that can let air
flow, but protects it from bugs and the like. I use a towel.
Step 10: After 3 or 4
days in warm weather, start tasting the kraut. In cold winter months
it can take a week or two. It should taste kind of alive and tangy –
something more than just salty cabbage. The taste will continue to
improve and get stronger as time goes on, but you can tell how you
like it and when you think it’s done. Don’t forget that every time
you take kraut out of the jar to pack your kraut back down to get
any air bubbles out.
When you have it tasting good, you can move it into the fridge to
slow the fermentation way down. I moved mine in after 1 week, but
fermentation is fairly dependent on the room temperature. It’s nice
and pleasantly warm here, so it fermented fast. If your house is a
bit colder, it might take longer. Probably a week to a week and a
half. When you move it to the fridge, the brine will probably go way
down, but you can top it up with a little salty water. It will keep
in the fridge for at least a few months!
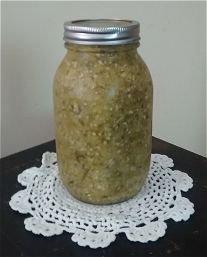
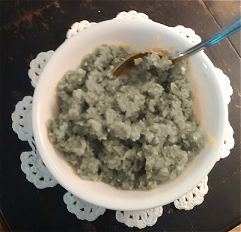
Ready for the refrigerator!
Step 11: ENJOY!!! YUM! It’s ideal to have a big spoonful with
each meal if you can. Susan and I have really been enjoying mixing
it with all our meals…. makes each one new and interesting!
Oh yes, one last note: Don’t ever heat your sauerkraut up. You have
to eat it raw or you’ll kill all the bacteria and you won’t get the
benefits!
|